Posts

Just for you

Image
Hi everyone I am up again with another tutorial using Memory Maze products. Today I have made a 6x6 inch card for you Firstly start with your 6x6 inch card base, I have used white for this. Cut your pattern paper at 5 7/8 x 5 7/8 inches and tape to your card base.  Then cut a second pattern paper at 5 3/4 x 5 3/4 inches.  Now with the second paper tear approx a 4 inch strip off the right hand side. Curl the torn edge and tape to the left side of your card base. Cut the smaller piece at 5 5/8 inches length wise. Curl the torn edge and tape to the left side as well. Paint all your chipboard pieces and while they are drying  cut a piece of the white glitter paper to fit inside the oval chipboard.  I turned my glitter paper over and traced the oval with a pencil then cut it out making a little bigger so I could glue to the back of the oval frame. Cover the oval frame, butterflies both metal and chipboard with the shabby white em...

Two baby cards

Image
Hi everyone welcome to my first 2019 blog post for Off The Rails . wow how time is flying. We the designers where set a challenge this month to choose another designers style. I t was hard but I chose Luciana Warnouski. I have been a follower of her for a long time. I just love her work. I choose this layout as it has white space and it is something I struggle with. I gave myself a double challenge to create a card using her layout. So here goes.... I made two baby cards one for a girl and one for a boy. And this is Luciana's layout I followed A little bit of mixed  media on this one. I started with a 6x6 inch card base. Cut a piece of pattern paper at 57/8 x 5 7/8 inches. Cut a plain white piece of cardstock at 5 3/4 x 5 3/4 inches Using this piece of cardstock, spray with the mist. Dry this well. Then sprinkle the pixie powder carefully over the card. and then spray with the water. Dry this well. Using the script stamp and...

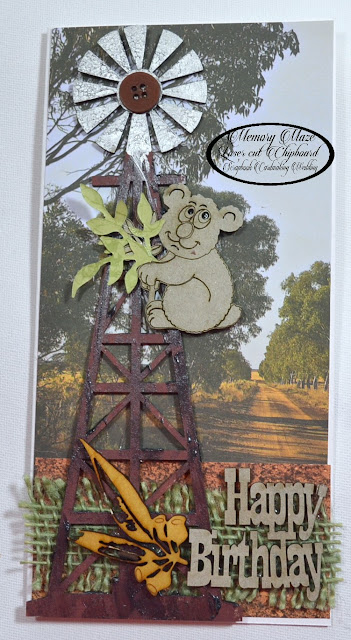
Happy Birthday Aussie theme

Image
Welcome to my first blog post for 2019. Yikes did I say 2019 the years are moving faster I think. Today I have created a 4 x 8 inch card using some chipboard pieces from Memory Maze. This card is created using an Aussie theme.  Cut your patrern paper to 3 3/4 x 7 3/4 inches and tape to the base of your card. Glue some green hessian along the bottom Cut some leaves, using some green paper and  the kaisercraft die or anyone you have at home. Paint the base of the windmill with some brown paint. Then use some grey paint or grey colour paste and daube here and there to make a weathered look. Paint the windmill blades with silver paint and add a button in the middle. Glue the windmill to the left side of the card base. Add the verse then the wooden leaves. Add the koala towards the top of the windmill adding the die cut leaves to the hands of the koala. Memory Maze products Windmill Happy Birthday Koala Othe...

Just for you

Image
Hi everyone I am back from a little break and ready to ctreate again. Today I have made a lovely little girls card. Using a fancy scroll and a word phrase. I have started with a 5 1/4 x 5 1/4 inch card base. I cut the first pattern paper layer at 51/4x51/4 inches. The second is cut from white glitter paper  and it is cut at 5 x 5 inches. The third is using another pattern paper and cut that one at  4 3/4 x 4 3/4 inches Distress around the edges of all three then tape the first two onto the card base. The third pattern paper curl the right top corner use a little glue to hold this in place. Then tape onto the card using foam tape. I have matted my photo and put foam tape underneath to raise it up. Now for the corner swirl and the word phrase all I did was give them a couple of coats of white ink.  When dry glue onto your card. Add a little piece of lace under the corner roll and then add some flowers to finish off. Mmeor...

Happy 30th Birthday card

Image
Hi everyone Candy here bringing you another 6x6 inch easel card using Memory Maze chipboard  I have left most of the chipboard pieces in there natural state. To tie in with the colour scheme of this card. The Happy birthday word piece  I inked with the green chalk ink and the 30 I used the red ink. Cover both pieces with some dimensional magic  to give a little dimension and to stand out more. Memory Maze products Vintage sign post Wire butterflies Script letters Vintage corner flourish Happy Birthday Other products 6x6 inch cream easel card base Assorted Prima papers Ecru cotton lace Green braid Olive vine and brick wall Prima chalk inks Dimensional magic Rhinestones Thank you for visiting Candy Chelepy 2018 Design Team

Happy Birthday Card

Image
Hi everyone my turn again to showcase some chipboard from  Memory Maze. I decide to make another card. This is for an order so I thought I would kill two birds with one stone So the saying goes. I made a 6 x 6 inch easel card. This one is for a 2 year old boy. Who loves machinery. I found the front End loader and thought yes that was ideal. I firstly painted the loader with white paint. You can use gesso or paint for this. I had some sharpie pens on  my desk I used the yellow for the body and black for the tyres. I then gave the tyres only a coat of dimensional magic. While this was drying I found a happy Birthday word and inked it with some black ink. You may have to give a couple of coats to get a nice finish. I have also used an acrylic 2018 heart. Memory Maze Products Front end loader Happy Birthday Family Hearts Other products 6x6  inch white easel card base Bo Bunny assorte...

Congratulations card

Image
I am up on Off The Rails this month. Using this moodboard as my colour palette. \ Here is my 5 x 7 inch card  Products used White 5x7 inch card base Prima papers and frame Assorted flowers, laces and a butterfly from my stash.