Posts

Showing posts from 2017

Mixed media canvas

Image
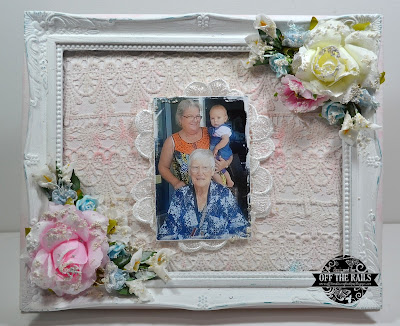
Hi Everyone Candy here with my latest mixed media canvas. This one is for an order for a friend from her Granddaughter to her Aunt... Just love this verse I'm not just an Aunt I'm a big cup of  Wonderful,  Covered in Awesome Sauce with a splash of sassy and a  dash of crazy I firstly applied white gesso to the canvas. Then applied the modelling paste and the mask all over. Let this dry Apply your sprays I used coffee and turquoise around the canvas I used a spray water bottle to dilute the colour and don't forget to dry between colours or you will make mud... It took me a while until I was happy with the colours just don't forget it will dry lighter. I glued the plastic frame using a good strong glue My canvas had a cut out piece where you place the photo underneath.  This is where I glued my frame. If your frame is glossy give a rub down with sandpaper to roughen so the gesso and sprays will take.

Advent Calendar

Image
Hello ladies today I have created an Advent Calendar. This is for my grand daughter Zarna. I have just put together a Kaisercraft Advent Calendar using good pva wood glue and clamps to hold it together until it dries. I painted the whole thing with some white gesso, I gave it 2 coats This is just to protect it from the elements. I measured and cut the christmas papers to suit.  Then applied using matt medium. Front of the draws, inside the square and also around the outside. I painted all the chipboard pieces with white gesso. Snowflakes, merry christmas, the two berries and leaves and also the scroll on the top. The scroll I coated well with the shabby white embossing enamel. The snowflakes and merry christmas word cover with seafoam embossing powder. And the berries cover with red and the leaves with green embossing powder. Put everything together and use some dimensional magic to make the numbers 1 - 24 stand out. Memo

Photo canvas frame

Image
Hello everyone.  Welcome to another month full of creativity. Today I have altered a 10 x 12 inch canvas and an old plasic frame I had in my stash for Off the rails. I have created this frame for my mum for christmas, I am sure she will love it. Here is the mood board I got my inspiration from I firstly covered the canvas with white gesso and also the frame as it was blue I had to use a few coats to cover it. When the canvas was dry I glued on the 3 pieces of lace using matt medium. Then added some spray, only a light cover. I then glued on the frame and used clamps to hold until it dried. I waited overnight so it was really dry.   Add the flowers with a strong glue. Then I added some white gesso and prills to the edges of the flowers and leaves. The photo measures 3 x 5 inches I sanded around the edges then addes some white gesso with my finger then more prills. I cut 3 lace flowers in half then glued them under my photo. And

October Mini retreat

Image
Well didn't we have fun girls. Two classes, plenty of good food. Thanks to my husband. Here are some photos of the girls creating up a storm Friday night getting some inspiration from a couple of sketches and a very full pizza box of goodies. Now we move onto our class Saturday and Sunday Making a start on our cigar boxes. And this is what we have all finished The front of the cigar box We also completed a flip out album Thanks for your company Jodie, Thelma. Lyndell and Sharon We made our own flowers from music paper, hesian and heaps of glitter

Stay positive, work hard, and make it happen

Image
Hello everyone... Candy here sharing with you all my layout I created  using the soccer ball chipboard. I cut about 1/2 inch from 2 sides of the pattern paper  then tape to the black cardstock. Using three of the soccer balls, give each one a good coat of the colour paste. I used a daubing motion to give them texture. Let this dry and glue the three to coloured pattern paper and cut around the edge with a craft knife. Double matt your photo and lay where you want your photo. Place the cogs and soccer balls around your photo. When you are happy glue these down. I added a couple of sequins on the cogs. Add your title and then using the grunge mask and colour paste place around the edges of your layout. Mmeory Maze product Soccer balls Other products used Black cardstock Kaisercraft factory 42 collection Machine and assembly line papers Paper from the paper pad Collectables Grunge film mask Corbet creation venee

Butterfly cards

Image
Hello everyone ..... Its me again ... Candy.  Today I am sharing with you my butterfly cards that I have created with the Birds on a branch chipboard. From Memory Maze The card I have made measures 4x8 inches.  The branch is from the birds on a branch chipboard. I coloured the leaves with the Lindgrum metallic 3d paint  and the branches with brown paint. The paper butterflies I painted with the Hellblaw metallic 3D paint. Just be careful if you are using paper flowers or butterflies as the are very fragile and might fall apart. So let them dry naturally. I have made a 4x8 inch card base.  Cut your pattern paper to measure 3 7/8 x 7 7/8 inches and tape this to the base of your card. I also roughed around the edges of the pattern paper. Glue down the branch and add your butterflies, flowers and sediment. An extra card for inspiration Memory Maze products Birds on a branch Other products used 4x 8 inch c

Steam punk cards

Image
Hello hello everyone.  Today I have made three male cards. When I saw this moodboard from Off the Rails I thought yes steampunk. This what I have created I am just going to feature one card for you with the instructions on how to make it. This is a 6x6 inch easel base made from cream cardstock Cut a piece of the pattern paper at 5 7/8 x 5 7/8 inches then a piece of the cream cardstock at 5 1/2 x 5 1/2 inches then put this through a cog embossing folder. I very lightly went over with some brown ink to make the cogs stand out a little more. Tape both of these to the front of your card base. I have used the collectable and just placed them where I liked them. Some are raised and some are flat. I also added a flair button. Now for the bottom. Cut a piece of the cream cardstock at 3 x 5 1/2 inches and also a pattern paper at 2 3/4 x 5 1/4 inches. Tape these together and use some faom tape to raise up. I added a sticker from the sticker sheet from the sam

Ten little fingers ten little toes

Image
Welcome again to another scrappy month.  Today I have  created a layout for Memory Maze  using a leaf mask and a verse from  the baby chipboard collection. I trimmed the background pattern paper to 11 1/2 inches square than taped it well to the cardstock. Cover well with some clear gesso and let dry. Using the larger leaf on the mask and the texture paste apply to the base using three of these leaves on each side of where you are going to place your photo. I then sprinkled my sprays over the leaves and sprayed with water to make them run . Do one at a time and dry between them. Stamp around the edges using the black ink and the script stamp. Splatter some ink around. The verse I painted with some white paint. Mine was old and gluggy this gave some texture I just daubed it on. Then before it dried sprinkle over some clear glitter. Glue down your laces, then double matt your photo  I just used some scraps of pattern paper I had in my stash

Happy Birthday card

Image
Hello everyone today it is my turn on the   Creative Inspirations active board Celebrations this month as it is our 1st Birthday. Happy Birthday to us.... My challenge I had to make a birthday card with a number on it. So I made a 6x6 inch card  Use a 6x6 inch cream card  base. Cut some pattern paper at 5 7/8 x 5 7/8 inches and the corogated cardstock at 5x5 inches. Tape these together and add your pink twine doubled over around the top of the lemon card. Cut seven banners from a piece of pattern paper and tape some on faom and some flat along the top of the twine.Add a sticker banner one on each end and one in the middle. Using a small white doiley scrunch up in the middle to make this smaller. Then add three sticker flower to the middle , rolled flowers, leaves and a flair button. To the right side of the doily piece, cut a piece of pattern paper to measure 2x3 inches and cut a V in one end. Tape this over the lemon card then add the tag sticker, words an

Hello You

Image
Welcome ladies nearly the end of August wow the year is going so fast. Today I have created a layout using a  Memory Maze heart template and fancy frame. And of course my beautiful grand daughter Zarna Rose. And she does like the camera. I have applied some mint texture paste over the heart  mask moving this around where I want my photo and frame. The squares I cut from a full sheet of paper.  Then used an edge distresser around all the edges. The frame I covered well with the silver texture paste, daubing all over. This has given a crackle messy affect. When this was dry I glued on my photo to the back of the frame. Add this to where I wanted it , then using foam tape under all the squares. Taping them around the framed photo. Add all the flowers and glass hearts,  then scribble around the edge of the layout and the small squares. Memory Maze products Mini heart stencil Vintage frame Other products used Create paper - cut g